





playwright
MCPDrives a real browser so the agent can open pages, click, fill forms and read what actually rendered.
 @windmill-labsInstall MCP
Ships with opengui: OpenGUI is an Android GUI agent framework for phone-use AI that can see, plan, and operate real mobile apps through the GUI.
Claude Code
$ claude mcp add opengui-local-android -- node ./lib/codex-mcp.js
Codex
$ codex mcp add opengui-local-android -- node ./lib/codex-mcp.js
Cursor
{
  "mcpServers": {
    "opengui-local-android": {
      "command": "node",
      "args": [
        "./lib/codex-mcp.js"
      ]
    }
  }
}
Add it to mcp.json.
Gemini CLI
$ gemini mcp add opengui-local-android node ./lib/codex-mcp.js
GitHub Copilot
$ copilot mcp add opengui-local-android -- node ./lib/codex-mcp.js
OpenCode
{
  "mcp": {
    "opengui-local-android": {
      "type": "local",
      "command": [
        "node",
        "./lib/codex-mcp.js"
      ]
    }
  }
}
Add it to opencode.json.
Windsurf
{
  "mcpServers": {
    "opengui-local-android": {
      "command": "node",
      "args": [
        "./lib/codex-mcp.js"
      ]
    }
  }
}
Add it to mcp_config.json.
From the README
Phone operations
open apps, tap, swipe, type, navigate back, and move between screens to complete multi-step workflows.
App testing
check features and workflows, record issues with reproduction steps and screenshots, and summarize results.
Content and information
read screen content, organize information, fill forms, and prepare social media drafts.
Visible execution
use the WorkBuddy workbench to view the phone screen, task steps, and reports, or take over and stop a task.
Host integration
use OpenGUI in WorkBuddy or DeepSeek Harness; the DSH plugin also supports managed browser operations.
Security report
Not enough data
Known flaws
Not published
Signed build
Not published
Maintained
Nov 9, 2026
Last push
Licence
Not published
Runs as
Local process
On your machine
Deprecated
Not published
Signals from public registries, not an audit. Checked Nov 13, 2026.
Language: English | 简体中文 | 日本語

A mobile GUI agent framework for Android.
OpenGUI helps AI agents see, understand, and operate Android app interfaces on real devices.
Use OpenGUI in WorkBuddy or DeepSeek Harness. Install the plugin, connect your phone, and describe your task. No full backend deployment is required.
OpenGUI uses real screenshots to understand apps and carry out phone operations and testing tasks from natural-language instructions.
After installation and authorization, enter these instructions in the corresponding host's chat. Replace [placeholders] with your task details.
| Purpose | Host | Example input |
|---|---|---|
| Open OpenGUI | WorkBuddy | /opengui |
| Check connected devices | WorkBuddy | /opengui List connected devices without operating a phone. |
| Operate a phone | WorkBuddy | /opengui Open Settings, then return to the home screen. Stop after confirming it is visible. |
| Test an app | WorkBuddy | /opengui Test [feature or workflow] in [app/page]. Record issues, steps, and screenshots. Stop at [end condition]. |
| Prepare a Tiktok draft | WorkBuddy | /opengui Prepare a Tiktok image-and-text draft about [topic]. Stop before publishing. |
| Run a task in DSH | DeepSeek Harness | @OpenGUI Open Settings and report the Android version |
Supported on macOS (Apple Silicon / Intel) with WorkBuddy 5.5.3 or later. The current public release is 0.4.2, a public-testing prerelease. China and international WorkBuddy use the same OpenGUI package and version. Custom MCP installation is available without a connector marketplace listing.
OpenGUI and WorkBuddy accounts are separate. OpenGUI SMS sign-in currently requires a mainland-China phone number; signing into international WorkBuddy with Google/GitHub does not sign you into OpenGUI.
Important Restart WorkBuddy once after installation. Finish other tasks, fully quit with ⌘Q, then reopen WorkBuddy before authorizing OpenGUI. Closing its window is not enough.
Step 1. Install with a Terminal command
Open macOS Terminal and run the command for your WorkBuddy edition. If you use both editions, install into each one separately. Complete the remaining steps in the edition selected here.
China edition — WorkBuddy.app
cd "$HOME" && curl -fsSL https://github.com/Core-Mate/OpenGUI/releases/download/opengui-workbuddy-v0.4.2/install.sh | bash -s -- --app "/Applications/WorkBuddy.app" --download-source cn
International edition — WorkBuddy AI.app
cd "$HOME" && curl -fsSL https://github.com/Core-Mate/OpenGUI/releases/download/opengui-workbuddy-v0.4.2/install.sh | bash -s -- --app "/Applications/WorkBuddy AI.app" --download-source official
These commands explicitly select the target application, so having both editions installed will not cause OpenGUI to be installed into the wrong one. If your application is elsewhere or has been renamed, replace the path after --app with its actual path. The script downloads and verifies the installation files, prepares the runtime, and configures OpenGUI.
The China command uses npmmirror for Node and npm dependencies with official fallback; the international command uses official sources. To use official sources with China WorkBuddy, change --download-source cn to --download-source official. This setting applies only to this installation. Video assets use GitHub separately; an npm mirror does not accelerate them. See download source options for a custom video mirror.
You can also download install.sh separately and run bash /actual/path/install.sh with the same --app and --download-source arguments shown above.
See international installation and account limitations, or the GitHub installation flow (Chinese) for a copyable WorkBuddy prompt, native authorization and connection verification.
Step 2. Restart WorkBuddy once
After the installer finishes, complete other WorkBuddy tasks, fully quit with ⌘Q, and reopen WorkBuddy to load the newly installed MCP configuration.
Step 3. Authorize the Skill and connector
opengui, complete the trust prompt, and enable it.opengui, and enable it.If an update triggers another Trust prompt, review and confirm it yourself.
Both the Skill and connector require authorization.
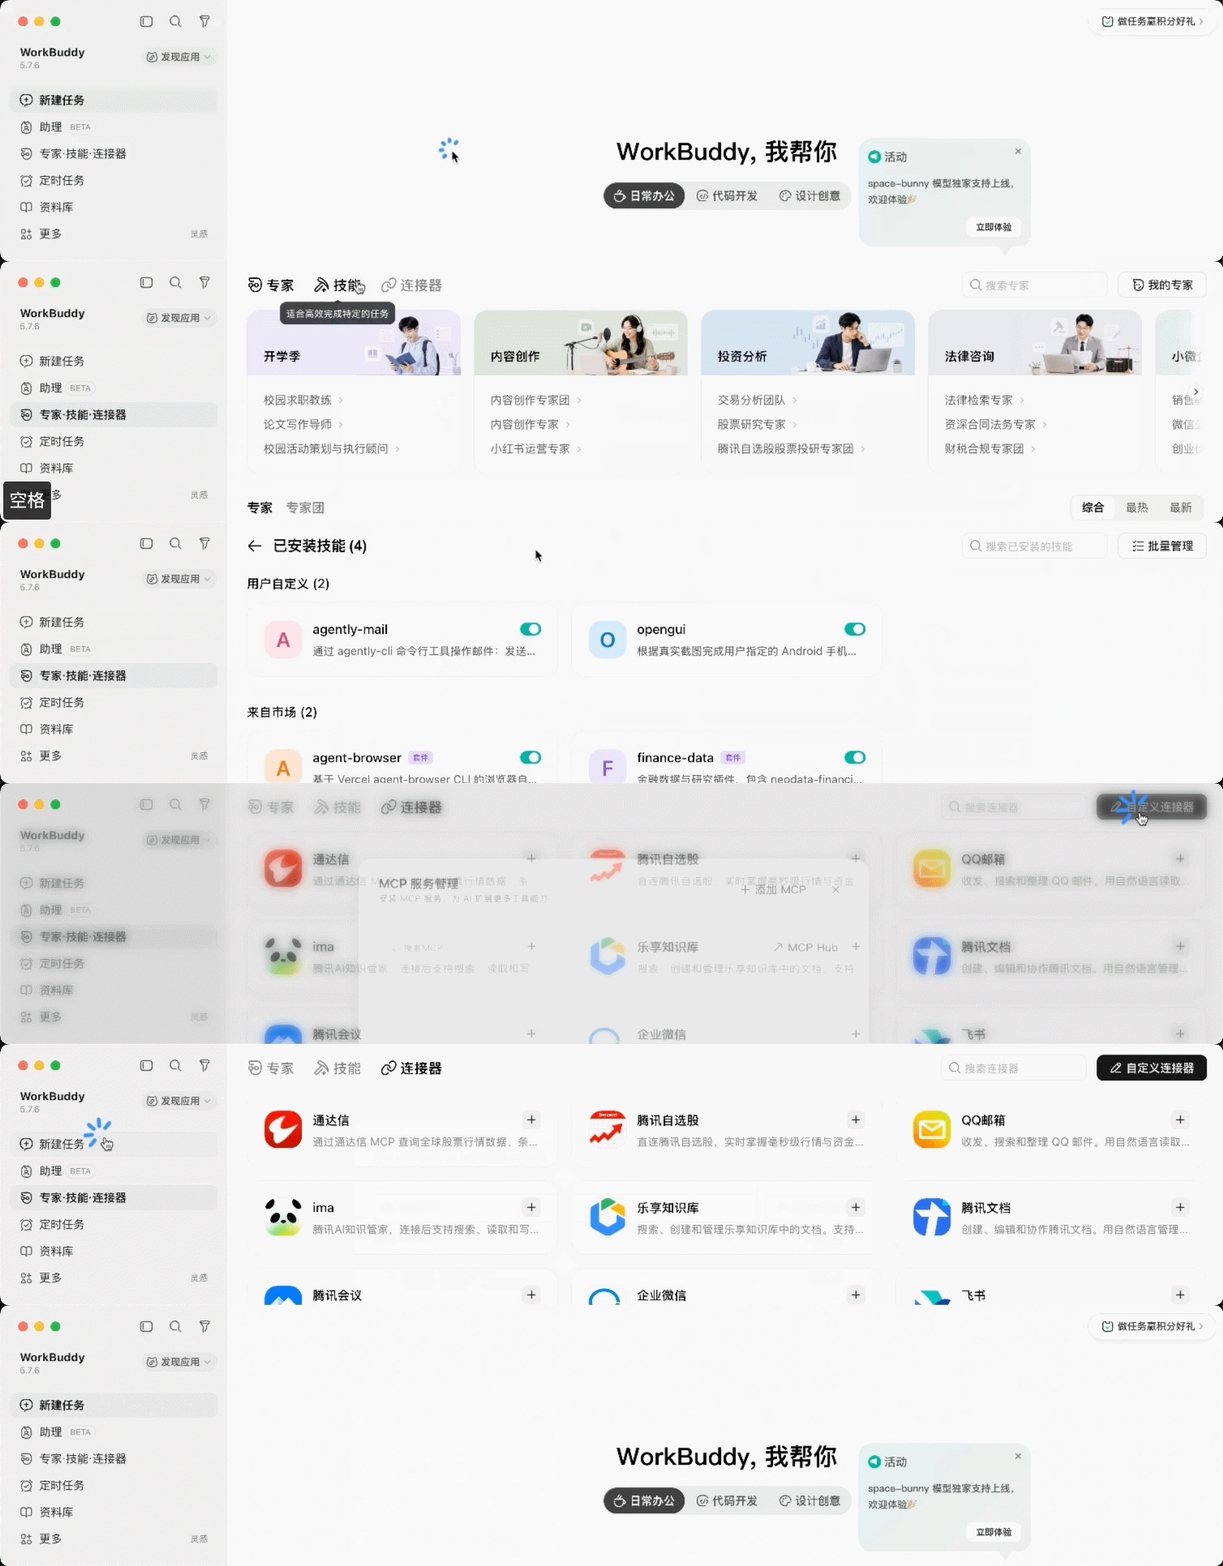
If OpenGUI is not listed under Connectors, check Custom connectors for its MCP service. If the authorization page did not open automatically, open the AUTHORIZATION_GUIDE path printed in Terminal; no reinstallation is needed.
Step 4. Verify the connection and start using OpenGUI
You can first ask WorkBuddy: “Call opengui_list_devices once to verify the connection, report the device count, and do not operate a phone.” A successful call returning zero devices also confirms the plugin connection.
To start a phone task:
/opengui in WorkBuddy to open the task home on the right, then sign into OpenGUI as prompted.Try it: Post on Tiktok
/opengui Prepare a Tiktok image-and-text draft about [topic] using [materials]. Stop before publishing.
Try it: Vibe Testing
/opengui Help me test [feature or workflow] in [app/page], focusing on [issues to check]. If you find any problems, record the steps and screenshots. Stop when [end condition] is reached.
UI language (0.4.2): Chinese/English switching, following WorkBuddy’s display language, and emulator-picker improvements are included. The language option translates interface labels; task descriptions, TODO content, and review drafts retain their original text.
The shortest path on macOS is to let Codex run the stable installer Skill from main. Each run resolves the latest stable OpenGUI plugin release, while an explicit version remains available for rollback. It requires Node.js 22.19+ or 24+ and installs the compatible DSH version automatically. Paste this as one prompt:
Install and run the OpenGUI installer Skill from https://github.com/Core-Mate/OpenGUI/tree/main/deepseek-harness-plugin/skills/opengui-coremate-install for my DSH web profile. Install the latest stable release. Proceed autonomously, and only pause when I need to authorize or select a phone, add or select a DSH workspace, or provide fallback visual-model credentials.
The Skill downloads the public release package and checksum, verifies SHA-256, installs only the OpenGUI plugin, starts DSH when needed, and opens DSH. It preserves unrelated DSH plugins and settings. The installer reports whether it reloaded a managed DSH or whether you need to quit an existing process and rerun it. For Linux or Windows, use the manual package guide.
Supported DSH versions are defined in the installer compatibility list. The default is 0.1.1-rc.2; use --dsh-version VERSION to select a listed version. The installer preserves other plugins, workspaces, model settings, and credentials. See the plugin installation guide for version changes and rollback constraints.
After installation, add or select a DSH workspace, connect and select an authorized Android phone, then send:
@OpenGUI Open Settings and report the Android version
The plugin adds phone and browser operation to DSH without requiring the full OpenGUI backend stack. The current source implementation admits one OpenGUI task per DSH session and separate tabs on non-conflicting phone sets; the managed browser remains globally serial. This source behavior is not a release claim. See more use cases or download the v0.1.13 release package.
GUI execution requires a model with image input and tool calling. DSH uses the current session model by default; configure a fallback visual model when needed, following the plugin guide. Evaluate execution quality, latency, and actual costs on your own tasks.
Use the full stack to self-host the backend and Android client or dispatch tasks through Feishu, Telegram, Discord, or REST APIs. WorkBuddy and DSH plugin users do not need this deployment.
Open Claude Code, Codex, or OpenCode in the repository root and send:
Read ./skills/open-gui-bootstrap/SKILL.md and help me run OpenGUI. Only ask me for phone-side actions.

Stars on GitHub
Drives a real browser so the agent can open pages, click, fill forms and read what actually rendered.
@windmill-labsInstall MCPShips with open-computer-use: open-computer-use is an open-source Computer Use service wrapped as MCP. Any AI agent or MCP client…
 @ifurystInstall MCP

